
A couple of weeks ago, the NSA released a complex binary analysis tool called Ghidra. When I discovered that, I was working on an ARM binary analysis tool (personal project). I was excited and I slapped a couple of different platform binary files I had to it and saw what the tool does. It was amazing. It performs several analysis and even generates pseudo-C code. IDA Pro is in a real competition now, I guess — a free tool with almost all the features one could ask for…
The last time I did Windows binary reverse engineering was probably more than 10 years ago. It was when I used to do malware analysis. Back in those days, I used to have sets of tools such as WinDbg, OllyDbg, PE Explorer, Dependency Walker, SoftICE, IDA along with Sysinternals tools such as FileMon, Regmon and Process Explorer. Each tool provided different interesting functionalities that made the overall malware analysis a lot easier.
With the excuse to see how Ghidra works, I decided to try reversing a simple Windows program. I grabbed the first Windows entry at crackmes.one, a site hosting CrackMe challenges. The challenge is to find the password.
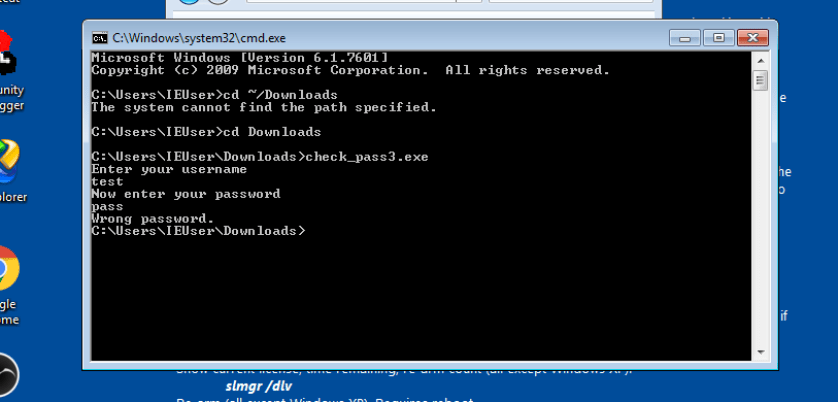
I ran the CrackMe challenge program in a VM and noticed it asks username and password. When we enter the wrong details, it displays “Wrong password.” as shown below. With this in mind, we open Ghidra and load the EXE (we skip a couple of screenshots regarding loading the EXE…).
We could start from the entry-point and look for the location where the password check happens. But that means we have to do unnecessary manual static analysis going through different dependences until we reach the interesting location. Instead, the easiest way is to walk through the import address table (IAT) looking for printing functions the program references. The idea is to find the location where “Wrong password.” is printed as it is the most probable location where the password comparison is done. If the function was loaded dynamically, then it wouldn’t appear in the IAT and we might need a different solution.
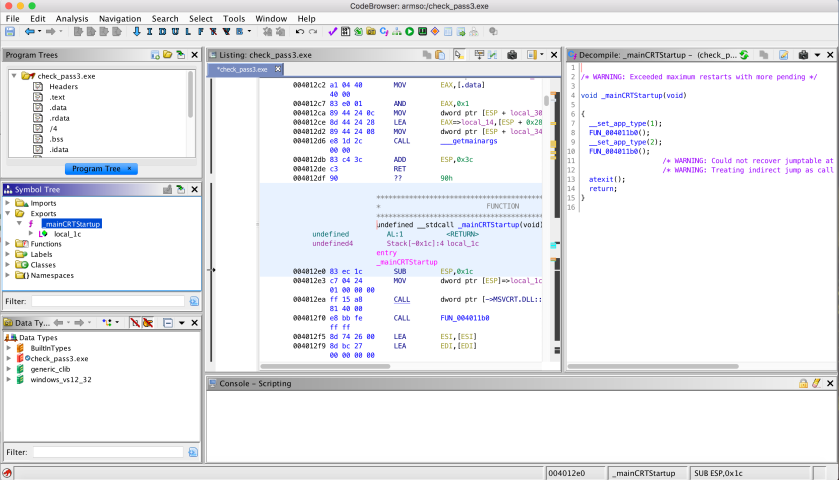
We see a printing function printf in the IAT. We look up its reference as shown below.


We see that a wrapping function _printf is calling the actual printf. We repeat the same process and find reference to _printf.
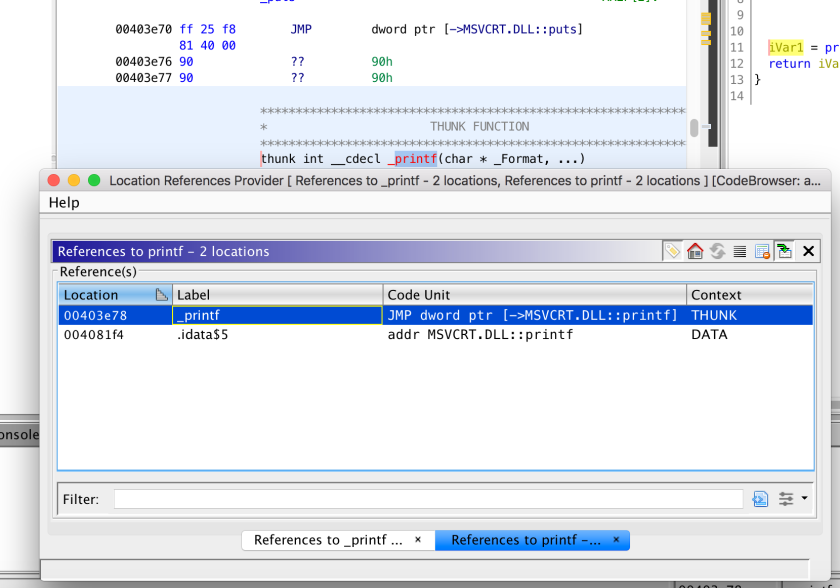
To do so, we click on _printf in the Location Reference Provider window, then we close the window and right click on the function identifier _printf then References > Show references to _printf in the context menu. 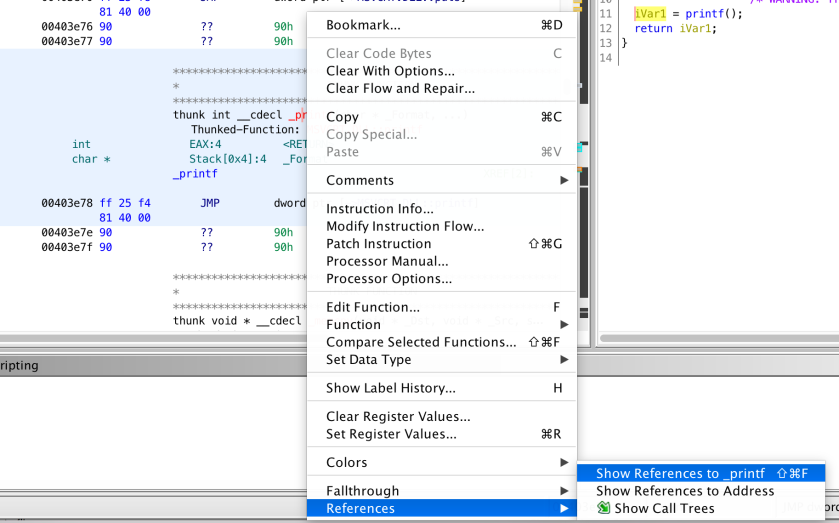
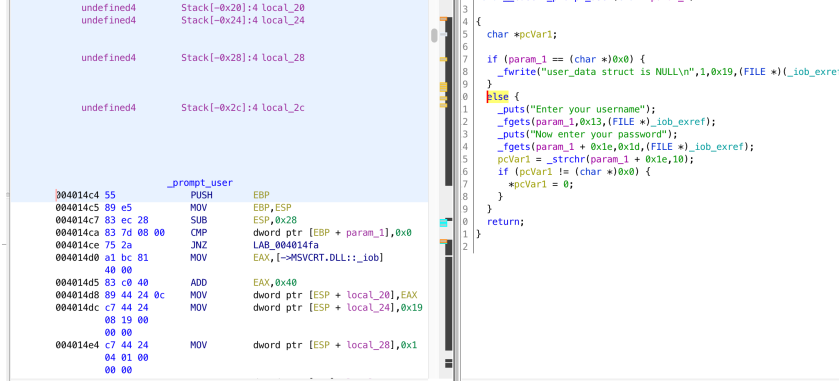
Selecting any one of the references shows the following result. On the left pane, the disassembly and on the right pane, pseudo-C. If we know some details about the function, such as the signature, we can, for example, change the function signature so that the tool better decompiles the program.

For this function, we don’t need to add much. So basically, it looks like it allocates a buffer for user input and calls _promt_user(buffer). _promt_user() looks like it is doing the following. Show the ‘Enter your username’ message, store a max of 19 bytes on the buffer as the username. Then prompt ‘Now enter your password’, then store the input with up to a max length of 29 bytes on the buffer at offset 0x1e (30) — which will be the password. Then look for ‘\n’ (decimal 10 or hex 0x0D) in the password section of buffer (offset 0x1e). If we find ‘\n’, then we set it as the end of the buffer by setting it to ‘\0’. Now, the buffer looks like the following.
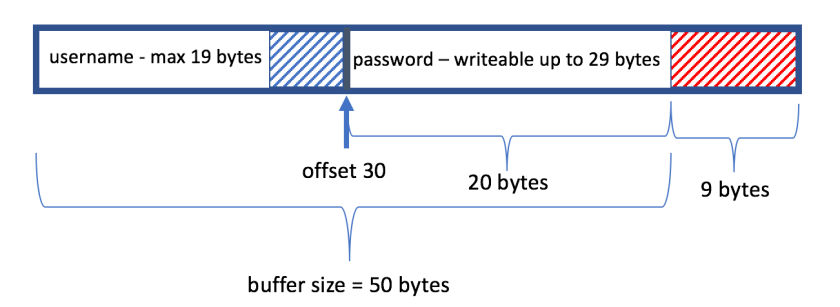
Some calculations do not add up. The buffer is 50 bytes long. However, the password is written at offset 30. Which means, the password length can only be 19 bytes (+ the remaining 1 byte being the terminating null character). But the program reads up to a maximum of 29 bytes from stdin as password (total 59 bytes, while the buffer is 50 bytes). This mean it allow the user to write 9 more character beyond the buffer size. We have buffer overflow here with only 9 bytes for the shellcode. Not enough to have a jump shellcode to the interesting location — 0x004014aa. But DoS is possible, return address is modified by writing more than 4 bytes. Let’s forget about the buffer overflow and move on.
We just saw that _promt_user() just askes the user to insert username and password and returns the user input. The next step is to check the password using _check_password(buffer).
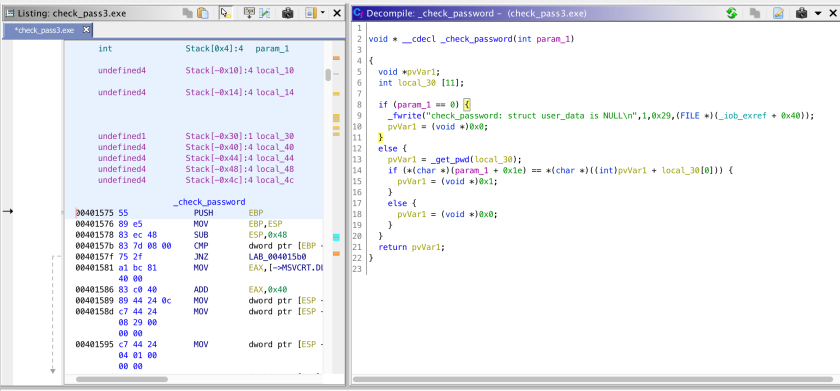
Here, the ‘stored’ password is retrieved using _get_pwd(_buff) and buffer[30] is compared with some_pointer+_buff[0] (variable local_30 renamed to _buff). Let’s see what _get_pwd(_buff) does.
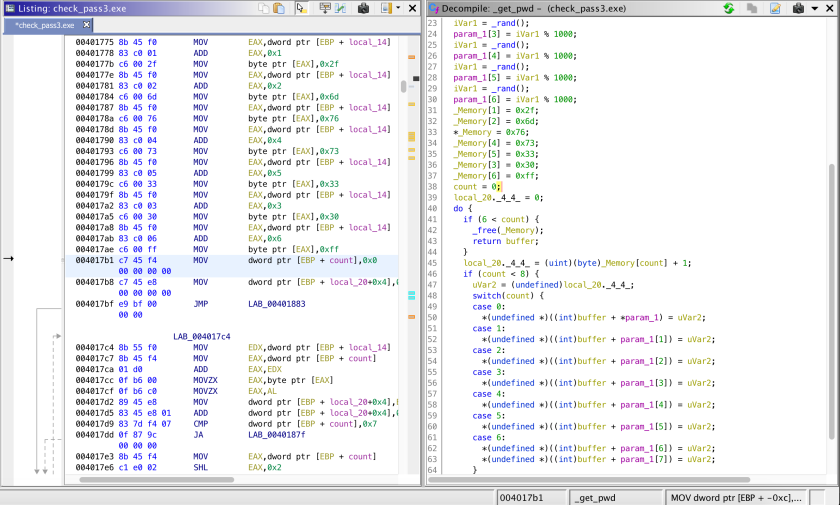
To summarize, this function creates and allocates a buffer[1000] in the heap, populates the integer array parameters (_buff) with random values, then assigns the following constants to variable _Memory.
_Memory[0] = 0x76; // 118
_Memory[1] = 0x2f; // 47
_Memory[2] = 0x6d; // 109
_Memory[3] = 0x30; // 48
_Memory[4] = 0x73; // 115
_Memory[5] = 0x33; // 51
_Memory[6] = 0xff; // 255
Then it iterates 6 times setting values in the allocated memory as follows.
- First, get _Memory[0]+1 = 119, then set buffer[_buff[0]] = 119, where _buff is the parameter to _get_pwd().
- Second, get_Memory[1]+1 = 48, then set buffer[_buff[1]] = 48….
- …. at the end return pointer to the heap buffer
Now, we are back at _check_password(). Earlier, we said, the ‘stored’ password is retrieved using _get_pwd(_buff) and buffer[30] is compared with some_pointer+_buff[0] (local_30 renamed to _buff). Now, let’s refine it.
- the ‘stored’ password is retrieved using _get_pwd(_buff), and buffer[30] is compared with buffer+_buff[0] (which is equivalent to buffer[_buff[0]]).
- recall from _get_pwd()’s first iteration, we have that buffer[_buff[0]] = 119.
- Therefore, the final check is: buffer[30] == 119 (buffer[30] == ‘w’)
- In other words, the first character of the password phrase (buffer[30]) must be equal to ‘w’.
With that, we conclude that the password is anything that starts with ‘w’, e.g., ‘world‘ and the username doesn’t matter.
The pseudo-C code provided by Ghidra is very helpful in better understanding the binary, though, sometimes renaming and retyping could be required. This was an exercise to understand if I still remember the basics of reversing Windows binary with the additional challenge of using a new reversing tool. It was fun.
One thing that I would like to mention regarding Ghidra is that, I kind of had a problem with scrolling. I was not using an external mouse during this analysis. Instead, I was using the touchpad on a Mac. However, scrolling down in the disassembly pane was problematic as it was jumping several addresses down or up and making me lose the location and I had to redo the the different steps to arrive to the location I was investigating. I don’t know if this is a specific problem but I will give it a try with external mouse and additional monitor.
What I am actually interested in is the headless version where some analysis output is produced via command-line and building some other automated binary analysis tool on top of it. Let’s see how it will go.
Ciao!

You must be logged in to post a comment.